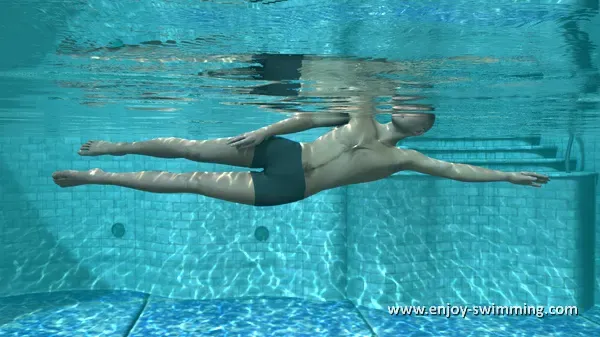
Although the side stroke is an older swimming style that is rarely used in competitions, it is still essential due to safety purposes. It is commonly used by lifeguards when rescuing victims as it allows you to hold the victim against your chest with one arm, and use the other for swimming. As its name implies, the side stroke entails swimming on your side while propelling yourself forward with a scissors kick and alternating arm movements.
It can also be used for relaxed long-distance swimming and can be swum on both sides, becoming a welcome alternative for those who are tired of the more common swimming strokes and want to have a bit of fun! Read on to find out how to swim the side stroke in 6 easy steps!
Being Role Models
From birth, children look to their parents as living examples of how to take on this world. Staying positive and showing up to lessons together with your child can teach them to adopt the right attitude to learning. Especially for young toddlers, children are extremely sensitive and in-tune with the verbal and non-verbal signals that their parents give off, and will imitate accordingly.
Positive energy is infectious, more so between parent and child. Getting hands-on and being in the water with your child would likely boost their enthusiasm about swimming. On the flipside, kids can sense if you are nervous and would most likely be fearful to be in the water. Don’t underestimate the influence you have over your kids, as your small actions will have a large impact on their love for the water.
1) Body Position
First, push off from the side of the pool. As a side stroke relies on gliding, ensure that when you push off the side of the pool, you are positioned on your side with your legs extended out, your lower arm extended out in front of you, and your upper arm resting flat on the side of your body. This sideways position should be maintained when swimming the side stroke.
2) Head Position
Next, check that your head is aligned with that of your spine and ensure that only half of your face is in the water, while the other half is above it. This ensures easier breathing and grants you a clearer view when swimming.
3) Arm Movements
Moving on to the nitty-gritty! When swimming the side stroke, start off by bending your lower arm at the elbow and pushing it back against the water. Next, make an in-sweep with your hand until it comes within a few inches in front of your chest, with your palm facing upwards. Simultaneously, bend your upper arm and slide it forward until your hand is above that of your other hand.
Additionally, it is also critical to make sure that both your palms are facing towards each other, with your upper arm’s palm facing downwards. Finally, extend your lower arm back to the front, while your upper arm pushes against the water in a backward sweep until it reaches its final position.
For easier referencing, many have also compared the arm movements in this stroke to apple picking.
(i) Begin picking an apple with your leading arm, while your other arm rests at your side.
(ii) As your leading arm sweeps backward, your other arm sweeps forward.
(iii) As your hands meet in front of your chest, your leading hand passes the apple to your remaining hand.
(iv) When they begin to move apart and retreat to their initial positions, your remaining hand throws the apple behind you at the end of the movement.
4) Leg Movements
Now that we have our arms all settled, next up on the list is to work those legs! Known as the scissors kick, this leg movement is an integral part of the side stroke. We begin with bending your upper leg, bringing your knee and foot towards your chest. Simultaneously, bend your lower leg and move your foot towards your behind. When your legs are unable to spread any further, extend them and push against the water, bringing them back to their initial position.
While this is occurring, ensure that your feet are pointed and moving in opposite semicircular motions. As a new cycle is about to begin, bend and spread your legs in opposite directions before extending and squeezing them back together. This will help you glide through the water with ease.
When swimming the side stroke, inhale as your arms move towards your chest. This action allows your chest and head to rise slightly higher out of the water, allowing you to inhale. Rolling your head upwards will also aid you in clearing water from the mouth. Exhale slowly as your arms part until the glide is over.
6) Turns
Last but not least, when executing turns you should turn into your stomach until both hands touch the wall. As your body is nearing the wall, bend your elbows and pull your legs under your body, towards the wall. Next, push off against the wall with both hands to gain backward momentum. However, ensure your hands leave the wall one at a time. When leaving the wall, the first hand should be stretched out ahead with your feet pushing off for momentum.
Conclusion
And here you have it! These are 6 easy steps for learning how to swim the side stroke. It may be hard to get the hang of it at first, but don’t give up! Practice makes perfect.
Sign up for our Condo Swimming Lessons to open up the marvelous world of swimming for your child today.
Hi! I’m Jae-Lyn, a university student with a passion for writing and travelling. On my free days you can spot me hanging out with friends, watching movies and chilling with my pet bunny, Mochi! I hope you enjoy reading through my articles as much as I enjoy writing them!